Having come from a web programming background, I was thrilled when I learned that an epub file is just a zipped HTML website. I’ve also seen enough weirdly formatted ebooks that I wanted to have the cleanest file possible. Since I’d be paying for the size of the download on Amazon, that was another reason to have a clean, lean file. I’d heard that it was easy to export from Scrivener, but that it wasn’t the cleanest, so I experimented until I came up with the following process. I initially had added Calibre in the mix to create my .mobi files, but soon found that it was the one responsible for messing up my coding.
I realize this is extremely specific to people using Scrivener, but I hadn’t found a lot of documentation for a Scrivener to Sigil process; seems like most Scrivener users export their epub and call it done. If you want to get a little fancier with your coding, though, you’ll need to get into the guts of the code. Also, I’m on a PC, so some of this will not apply to Mac users.
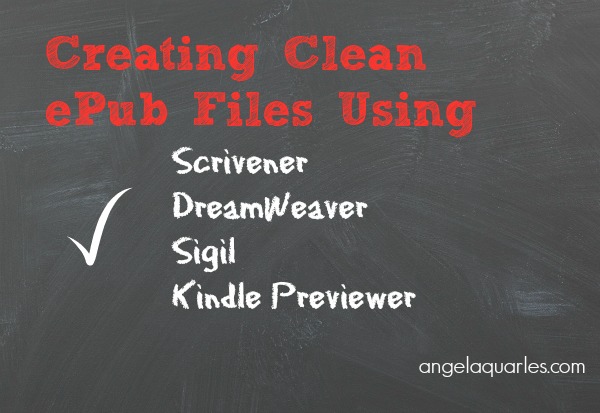
What You’ll Need
- Compression/Decompression program. I believe this comes already installed on PCs.
- Dreamweaver (DW), or another HTML editing program. I happened to already have this installed because of my old career. If you don’t have this, you can skip straight to Sigil, I just found it easier to use DW for some of the heavy lifting in search/replace and creating the styles I wanted, since it’s designed for this.
- Sigil, which you can download for free here
- Kindle Previewer, which you can download for free here
- Some familiarity with HTML already.
Steps to Creating a Clean ePub file
Using this method, I had no problem uploading this file to the various vendors. It validated clean.
- Export epub from Scrivener. I found it helpful to make a folder called eBook in my book’s Production folder.
- Open file first in Sigil. I found that this created a slightly different folder structure than if I’d just opened it without this step. Save.
- Go to the file in Windows Explorer and change file extension from .epub to .zip
- Right click on .zip file and unzip it.
- Create a project in Dreamweaver and point it to your new unzipped folder. The top level folder structure should contain these two folders: OEBPS and META-INF. It’s the former folder that has all your files you’ll be using (and the one whose name is different if you don’t open first in Sigil. If you don’t open in Sigil, you’ll end up with 3 folders, and it gets confusing. Just open in Sigil first 🙂 )
- If you already have your CSS style sheet, go ahead and replace the existing code with it. If not, this is when it’s probably easiest to make your style changes.
- Do some site-wide Find/Replace
- I wanted to have my Chapter headings hyperlinked and using a header style, so I did a search on whatever style Scrivener had assigned for my chapter headings and replaced with: <h1 title=”Chapter One”><a href=”..Text/contents.xhtml#tocchapter1″>
- Find the normal class and replace with <p>. Scrivener will have assigned some kind of class to your regular paragraphs, which you don’t need, so just replace it with a plain <p> tag
- Replace <span> with blank. Scrivener inserts a lot of these which are not needed and bloat your code
- Replace any blank paragraph spaces
- Replace <body class=”scrivener2″> with <body>
- Replace <p class=”scrivener3″>****</p> (or whatever the class code is) with <p class=”doodad”><img src=”../Images/doodad.gif” alt=”Scene Break”></p>. I’d set up Scrivener to use **** as my scene breaks and this replace text is specific to me as I wanted an image here instead. But just replace it with whatever you want your scene break to be. If you want to keep it plain, I’d still give it a better class name, like this <p class=”sceneBreak”>****</p> so you can control it via CSS.
- Replace any spans that are just italics to <i>
- Search for the following quote marks/special characters and replace. I found later that Sigil switched some of these back, and so you might not need to do this, but I was paranoid about having unreadable characters…
Left double quote= “
Right double quote = ”
Right single quote = ’
Left single quote = ‘
Em-dash = —
Replace copyright symbol with ©
é = é
ê = ê
à = à
The c in façade, etc = ç - Open each chapter and Change Chapter title to correct number
- Go through and assign classes to any text outside your normal body text. For instance, I had some text messages, letters, and the like, and I wanted them to display differently. So I peeked into the code to see what class Scrivener had assigned it and did a search and replace to a better class name, etc.
- Doublecheck links on Thank you page
- Insert any images. Easier at this stage. I had a plain title page image and an author photo.
- Rezip, and change file extension to .epub
- Open in Sigil
- It will say it needs to clean it up, and click OK. It will delete all the end tags that didn’t have a start tag (when you went through and deleted all <span> tags, for instance, it left a lot of orphaned </span> tags). It will also add all your closing <i> tags you added.
- Add the images to the images directory
- Add all the <a id=”tocchapter1″ /> anchor tags to content.xhtml
- Open content.opf
- In spine, move contents and copyright to the end (if you want it in the backmatter instead), and also make sure rest is in the right order
- Add this to guide: <reference href=”Text/body2.xhtml” title=”Dedication” type=”text” /> — this tells Kindle where to open. I wanted mine to open on the dedication page.
- Open TOC.ncx and change the order so copyright and toc are at the end
- Save and click on the green checkmark and address any issues it might have found.
- Save. Now you have an epub file.
- To create your .mobi file, do a Save As and call your epub something different. I tacked on ‘_Amazon’ to the end of my file name, so it was MustLoveBreeches_Amazon.epub
- Open the content.opf file and in the guide, change your cover code line to point to the image instead of the text file. I found that if I left it as is, Kindle Previewer gave me an error (though it still worked). For instance, my cover guide code was: <reference href=”Text/cover.xhtml” title=”Cover” type=”cover” /> which pointed to the html file where my cover was located. However, if I changed it to point to where I had the cover image instead, my file was error free: <reference href=”Images/cover.jpg” title=”Cover” type=”cover” />. Your file names might not be the same, so change it to reflect your file names, and also pay attention to case, as it’s case sensitive.
- Launch Kindle Previewer and open up your Amazon epub and it will automatically create a folder with your mobi file in it. It’s also useful to test here on the various Kindle platforms to see if your code is working great.
- Rename your mobi file and move it up into your main Ebook folder.
This will give you a nice clean epub and mobi file. I ended up (after I made sure I had my final version) creating separate epub files for ARe, Nook, and Kobo, so that I could have the links on the Thank you page go specifically to those sites.
You can validate it here, but if you’re doing a lot of validating, you might want to go ahead and download Pagina. It’s free–the site is in German, but you don’t need to know German to use the program, just scroll down until you see the Windows download option.
Note on CSS
Your CSS file is where all the styling action happens. I left that out as it was specific to my book, but that is where I coded it to not indent my first paragraph, make my first line all small caps, gave my chapter headings a different font, etc. I might do some future posts on how I did each of these, if you’re interested.
This is also where Calibre failed me. I had created my CSS and was tearing my hair out trying to figure out why the file on my kindle wasn’t reflecting it. At this stage I didn’t know about Kindle Previewer and I was painstakingly making changes to my epub, pulling it into Calibre and then sideloading it onto my Kindle. I kept thinking my CSS was wrong, until I stumbled on something somewhere in my Google searches that made me think Calibre could be the culprit. That’s when I downloaded Kindle Previewer and breathed a sigh of relief. It wasn’t my code, it was Calibre messing with it. Since then I’ve heard that Calibre is not a conversion tool (though it does convert). It’s intended use is to manage your digital library, but it’s not meant to be used to create your files.
Do you have any questions? I know I assumed some previous HTML knowledge in order to make this post a reasonable size, so if I skimmed over something, please ask. Have you used a similar process? What tricks and tips do you have?
Thanks for this, Angela. I’ve seen a lot of stuff out there for Mac users, but this is the first time I’ve seen step by steps for PC folks. As an accountant, I have a background in the vbscripting language, and I’ve been meaning to get around to writing a script that will do all of this within MS Word, but the steps above seem pretty simple, so I might just knock this down a few notches on my to do list.
I haven’t tried your process yet, but it looks awesome! Just a note: Dreamweaver can strip the entire tag (opening and closing tags) using Find and Replace. Under the “Search” dropdown where it says “Source Code” change that to “Specific Tag.” Then you can search for the and then set the Action to “Strip Tag” so you won’t have any orphaned closing tags. Lots of other great features in that window!
Thanks for sharing this. What was the difference in file size? How much did you save per download?
You know, I didn’t think of doing that! I should have! I’ll try to do that next time…
Ok. Great! 🙂 Thanks for the speedy response.
Great write up for resourceful DIYers.
Keep in mind that mobi files have up to three versions of the book inside: the epub source, a KF8 version and a legacy KF7 version. The size on disk, then, is roughly three times the size of the epub. This mobi file size is NOT what KDP uses to calculate the delivery fee; rather it uses the size of the component that gets delivered to the reader.
Thanks for this. I used to do Word to HTML for ebooks but I sort of bought into Scrivener is the be all and end all product for writers. (Seems Mac users are pretty happy, but PC users of Scrivener are not – I’m a PC user)
I have now just written a book in Scrivener and find the compile to .mobi is creating 1.5x line spacing instead of single and other issues. It’s a pity because I didn’t want to get back into third party products but it looks as though I’m going to have to.
What do all those mean? After breaking open in Sigil I’m finding in what should be simple blah blah Scrivener has all the way up to ?? Surely this should be one class for body text?
If I can find a simple fix to my line spacing issues and can remain in Scrivener I’ll post up what it was. Otherwise… back to coding…
Second to last paragraph had some code in it that hasn’t come up… that’s why it reads a bit crazy…
Handle your 1.5x line spacing issue in Scrivener this way. Load epub in Sigil, open css style sheets in folder Styles. change P and perhaps body to css style you prefer. Save in Sigil then use Kindle Previewer to generate a mobi file from the eput file. Obtain correct CSS style sheet from here. http://bbebooksthailand.com/bb-CSS-boilerplate.html.